Docker Introduction
Docker containers are everywhere in modern development and operations. If you walk into most any tech conversation today, within 10 minutes people will likely be talking about containers in some way shape or form because it’s that big right now. It’s that big for good reason, containers make it easy to devleop a product and have it work the same across different environments. They’re trying to solve the “It works on my system” problem. There are still challenges that need to be addressed going between development and production, but containers help us ease some of that.
In this article I am going to give the basics of installing Dcoker, getting a Docker image, running a container and some basic Docker interactions.
Docker is easiest run on either Linux or Mac. If you’re on currently running Windows I recommend installing VirtualBox then creating an Ubuntu VM to do your Docker work. I’ll be working off my host system which is Currently Ubuntu 17.10.
My Opinion - If you’re running Windows a better option is to dual boot Ubuntu beside Windows and use that as your primary OS, reserve Windows for the only thing it’s good for, gaming. WARINING - If you’re not familiar with Dual Booting or installing Linux, be extremely careful as you could inadvertently erase your hard drive. You might want to stick with VirtualBox as it will give you some experience installing Linux.
Requirements
Give the docs linked above in the requirements a read if you haven’t already and you’ll be better off.
Steps I’m going to cover
Let’s roll
Install Docker
First thing we need to do is get docker installed on our system. I have written a script for Ubuntu 16.04 to 18.04 called ‘ubuntu_install_docker.sh’ which you can download here. * CRITICAL - The above is a random script from the internet. GO THROUGH IT! Make sure it’s doing what you think it is. And don’t think “Oh this guy put a warning telling me to go through it, it must be ok.” GO THROUGH IT.
Alternatively you can go to the Docker install page linked above and follow the instructions provided there.
Docker Images
Before you start pulling images you should understand some basic concepts. Docker needs the following 3 pieces of information in order to pull an image.
- Registry - Contains 1 or more repositories. Can be public ex: Dockerhub (Default location that Docker pulls from), or private ex: AWS ECR which requires you to login.
- Repository(Repo) - Contains 1 or more images identified by tag.
- Tag - User friendly way of identifying a particular image. Single image can have multiple tags.
Example image location: registry.hub.docker.com/library/ubuntu:latest
- Registry - registry.hub.docker.com/library/
- Repository - ubuntu
- tag - latest
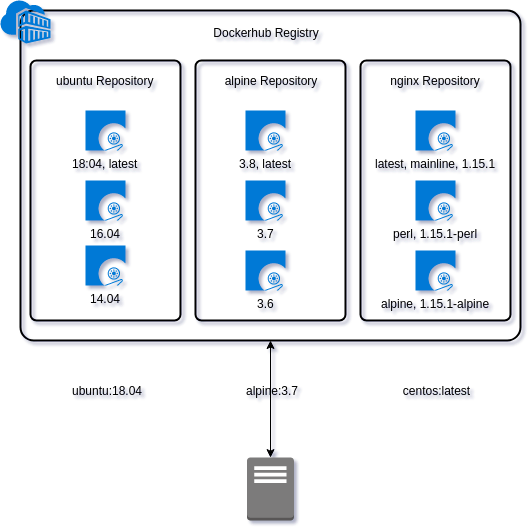
In the above picture you can see that we have the Dockerhub Registry which contains repositories for ‘ubuntu’, ‘alpine’, and ‘nginx’. There are multiple images stored in each repository, some with multiple tags.
Tags gets removed from the first image when a second image is tagged with the same tag.
- Confusing much?
Take for example the ubuntu Repo. In the image above there is an image tagged with both ‘18.04’, and ‘latest’. But when the next version of Ubuntu is released say 18.10 they can tag the newest image with ‘18.10’ and ‘latest’. The ‘latest’ tag simply gets moved from the 18.04 image to the 18.10 image. This allows you to either get the newest image by using the latest tag, or pin to a specific version.
- WARNING - As with most package versioning you need to be careful. Using latest could break your builds if you accidentally get a newer version and your code, or configuration is not compatible.
Pull Image
So now that you understand where images come from, how do we get them. It’s actually pretty simple you just run:
docker pull ubuntu:16.04

16.04: Pulling from library/ubuntu
b234f539f7a1: Pull complete
55172d420b43: Pull complete
5ba5bbeb6b91: Pull complete
43ae2841ad7a: Pull complete
f6c9c6de4190: Pull complete
Digest: sha256:b050c1822d37a4463c01ceda24d0fc4c679b0dd3c43e742730e2884d3c582e3a
Status: Downloaded newer image for ubuntu:16.04
Really? All that lead up just for docker pull ubuntu:16.04? And I thought docker needs 3 pieces of information I only see the repository and tag in your command. Yep That’s it. As I mentioned earlier, Docker will try pulling from Dockerhub by default if you don’t specify a registry. The full pull command would look like docker pull registry.hub.docker.com/library/ubuntu:16.04.
- CRITICAL - Just like downloading random shell scripts from the internet can be bad, pulling random docker containers from the internet is just as bad! There was recently a case of tainted containers on dockerhub being used for mining crypto currencies. They could just have easily shipped all of your code anywhere. Be careful and research where your image is coming from.
Docker is reasonably smart. If an image has multiple tags, and you’ve already pulled ‘latest’ pulling ‘18.04’ is not going to do anything. So how do we see what images we have locally? Run docker images
docker images

REPOSITORY                               TAG                 IMAGE ID            CREATED             SIZE
hugo                                     latest              4e599c8f3b0d        2 days ago          511MB
<none>                                   <none>              df3986c3e1f1        2 days ago          81.5MB
<none>                                   <none>              f8d15fba5712        2 days ago          510MB
<none>                                   <none>              6fb84c6bf962        5 days ago          468MB
<none>                                   <none>              ac88b89be6b2        4 weeks ago         86.6MB
ubuntu                                   16.04               5e8b97a2a082        4 weeks ago         114MB
registry.hub.docker.com/library/ubuntu   16.04               5e8b97a2a082        4 weeks ago         114MB
ubuntu                                   18.04               113a43faa138        4 weeks ago         81.2MB
ubuntu                                   latest              113a43faa138        4 weeks ago         81.2MB
gnoinski.ca                              latest              b7dc11800da1        3 months ago        278MB
alpine                                   latest              3fd9065eaf02        6 months ago        4.15MB
devopsdays/docker-hugo-server            v0.30.2             02c8fd4a0c02        7 months ago        31.9MB
Looking here, I have some alpine, ubuntu, devopsdays (I helped organize DevOpsDays Victoria 2018) images kicking around.
And then there is hugo:latest and gnoinski.ca:latest. These are containers I have built, which is a process I will get into in the next Docker post.
We should always cleanup after ourselves. We can remove old images by running docker rmi {IMAGEID}
docker rmi 6fb84c6bf962
Error response from daemon: conflict: unable to delete 6fb84c6bf962 (must be forced) - image is being used by stopped container da00ca55e1d7

docker rmi -f 6fb84c6bf962
Deleted: sha256:6fb84c6bf96217a7839e0a2af2e72978e6b123a35f3883ebd5ea24f46cf55213
Deleted: sha256:3963865fa921bb662d55f88dab5e08e66db64b105be13771e79e53c40213e5c3

docker images
REPOSITORY                               TAG                 IMAGE ID            CREATED             SIZE
hugo                                     latest              4e599c8f3b0d        2 days ago          511MB
<none>                                   <none>              df3986c3e1f1        2 days ago          81.5MB
<none>                                   <none>              f8d15fba5712        2 days ago          510MB
<none>                                   <none>              ac88b89be6b2        4 weeks ago         86.6MB
ubuntu                                   16.04               5e8b97a2a082        4 weeks ago         114MB
registry.hub.docker.com/library/ubuntu   16.04               5e8b97a2a082        4 weeks ago         114MB
ubuntu                                   18.04               113a43faa138        4 weeks ago         81.2MB
ubuntu                                   latest              113a43faa138        4 weeks ago         81.2MB
gnoinski.ca                              latest              b7dc11800da1        3 months ago        278MB
alpine                                   latest              3fd9065eaf02        6 months ago        4.15MB
devopsdays/docker-hugo-server            v0.30.2             02c8fd4a0c02        7 months ago        31.9MB
I have some old containers laying around as well that I haven’t cleaned up so I had to force removal of this image.
- WARNING - As with everything be careful when you are removing things in case you need it. But part of the beauty of Docker when used properly is that you should be able to rebuild the image as long as you still have the Dockerfile. Which is a process I will get into in the next Docker post.
Run Docker Container
Now that we have an image we want to actually do something with it. In comes docker run.
I don’t use the basic run command other than troubleshooting, but here it is anyways.
docker run repo:tag
docker run ubuntu:18.04
If you run this all you will get is a new line so let’s check and see what containers are running with docker ps
docker ps
CONTAINER ID        IMAGE               COMMAND                  CREATED             STATUS              PORTS                    NAMES
f1c688e3e7c6        hugo:latest         "/usr/bin/hugo serve…"   24 hours ago        Up 24 hours         0.0.0.0:1313->1313/tcp   hugodev
All that’s runing is hugo:latest and it’s been up for 24 hours. No mention of the ubuntu:18.04 we just ran. So now run docker ps -a to show all containers.
docker run ubuntu:18.04 && docker ps -a
CONTAINER ID        IMAGE                COMMAND                  CREATED                  STATUS                              PORTS                    NAMES
f0b275b54705        ubuntu:18.04         "/bin/bash"              4 minutes ago            Exited (0) 4 minutes ago                                     jovial_colden
f1c688e3e7c6        hugo:latest          "/usr/bin/hugo serve…"   24 hours ago             Up 24 hours                         0.0.0.0:1313->1313/tcp   hugodev
Well theres our container it exited 4 minutes ago. That’s because Docker requires some sort of long running process for the container to stay up. When we ran our container it started, there was no process, so it stopped. This is no good to us. Let’s try running a command then:
docker run ubuntu:18.04 ls -alh

total 72K
drwxr-xr-x   1 root root 4.0K Jul 10 03:48 .
drwxr-xr-x   1 root root 4.0K Jul 10 03:48 ..
-rwxr-xr-x   1 root root    0 Jul 10 03:48 .dockerenv
drwxr-xr-x   2 root root 4.0K May 26 00:45 bin
drwxr-xr-x   2 root root 4.0K Apr 24 08:34 boot
drwxr-xr-x   5 root root  340 Jul 10 03:48 dev
drwxr-xr-x   1 root root 4.0K Jul 10 03:48 etc
drwxr-xr-x   2 root root 4.0K Apr 24 08:34 home
drwxr-xr-x   8 root root 4.0K May 26 00:44 lib
drwxr-xr-x   2 root root 4.0K May 26 00:44 lib64
drwxr-xr-x   2 root root 4.0K May 26 00:44 media
drwxr-xr-x   2 root root 4.0K May 26 00:44 mnt
drwxr-xr-x   2 root root 4.0K May 26 00:44 opt
dr-xr-xr-x 337 root root    0 Jul 10 03:48 proc
drwx------   2 root root 4.0K May 26 00:45 root
drwxr-xr-x   1 root root 4.0K Jun  5 21:20 run
drwxr-xr-x   1 root root 4.0K Jun  5 21:20 sbin
drwxr-xr-x   2 root root 4.0K May 26 00:44 srv
dr-xr-xr-x  13 root root    0 Jul  5 02:54 sys
drwxrwxrwt   2 root root 4.0K May 26 00:45 tmp
drwxr-xr-x   1 root root 4.0K May 26 00:44 usr
drwxr-xr-x   1 root root 4.0K May 26 00:45 var

docker ps
CONTAINER ID        IMAGE               COMMAND                  CREATED             STATUS              PORTS                    NAMES
f1c688e3e7c6        hugo:latest         "/usr/bin/hugo serve…"   24 hours ago        Up 24 hours         0.0.0.0:1313->1313/tcp   hugodev
This time we gave docker run the command we wanted to run at the end ls -alh. Docker started the container, executed the command and sent the output of the command to standard out. But the container still isn’t running? That’s because ls -alh is not a long running process, it ran and exited, then the container exited once the command finished.
For troubleshooting the easiest way to get a container to run is like so docker run -td ubuntu:18.04. What’s this -td stuff? well let’s jump into the manual and find out.
man docker run

-d, --detach=true|false
          Detached mode: run the container in the background and print the new container ID. The default is false.

-t, --tty=true|false
          Allocate a pseudo-TTY. The default is false.
We start the container, give it a pseudo-TTY and put it in detached mode. And in more basic terms, start the container with a console (long running process) and make it a background process.
docker run -td ubuntu:18.04
20b1063629d6185d270380aa0cfb325b70840ae6497beffa6bf88001f76fffe9

docker ps
CONTAINER ID        IMAGE               COMMAND                  CREATED             STATUS              PORTS                    NAMES
20b1063629d6        ubuntu:18.04        "/bin/bash"              9 seconds ago       Up 8 seconds                                 hardcore_davinci
f1c688e3e7c6        hugo:latest         "/usr/bin/hugo serve…"   47 hours ago        Up 47 hours         0.0.0.0:1313->1313/tcp   hugodev
Well alright, now it’s running. But since it’s in the background we can’t do anything with it.
The next command is docker exec -it {CONTAINER_ID} {command} where {CONTAINER_ID} is the container id returned from the run command. It doesn’t have to be the full id, can be just the first few characters so long as docker and definitely select a single container. {COMMAND} is the command you want to run, I usually run a shell such as /bin/bash or sh depending on which image I am using. If you want to know what the -it does, you should be able to look it up in the man page for yourself now ;).
docker exec -it 20b1 /bin/bash

root@20b1063629d6:/# ls
bin   dev  home  lib64  mnt  proc  run   srv  tmp  var
boot  etc  lib   media  opt  root  sbin  sys  usr

root@20b1063629d6:/# vim
bash: vim: command not found
After running the command I was in a shell inside the container. As you can see Vim is not installed by default. The reason for this is we want our base images to be as bare bones as possible, so we install only what is required to run our application. You have the ability to install any packages that are available for your Linux Distribution, just most are not installed by default.
apt install vim
Reading package lists... Done
Building dependency tree
Reading state information... Done
E: Unable to locate package vim
root@20b1063629d6:/# apt update

... OUTPUT HERE

Fetched 25.5 MB in 11s (2378 kB/s)
Reading package lists... Done
Building dependency tree
Reading state information... Done
10 packages can be upgraded. Run 'apt list --upgradable' to see them.
root@20b1063629d6:/# vim
bash: vim: command not found
root@20b1063629d6:/# apt install vim
Reading package lists... Done
Building dependency tree
Reading state information... Done
The following additional packages will be installed:
  file libexpat1 libgpm2 libmagic-mgc libmagic1 libmpdec2 libpython3.6
  libpython3.6-minimal libpython3.6-stdlib libreadline7 libsqlite3-0 libssl1.1
  mime-support readline-common vim-common vim-runtime xxd xz-utils
Suggested packages:
  gpm readline-doc ctags vim-doc vim-scripts
The following NEW packages will be installed:
  file libexpat1 libgpm2 libmagic-mgc libmagic1 libmpdec2 libpython3.6
  libpython3.6-minimal libpython3.6-stdlib libreadline7 libsqlite3-0 libssl1.1
  mime-support readline-common vim vim-common vim-runtime xxd xz-utils
0 upgraded, 19 newly installed, 0 to remove and 10 not upgraded.
Need to get 12.7 MB of archives.
After this operation, 61.0 MB of additional disk space will be used.
Do you want to continue? [Y/n]
Just like an actual Ubuntu system I had to run apt update and then apt install vim. By default Ubuntu wants you to run apt update so that you get information about the latest packages available.
If you are in a shell session you just need to run exit to get back to your host system and leave the container running.
Now you’ve been installing stuff, and have your container just the way you want it and you are done for the day but don’t want to leave it running. You can run docker stop {CONTAINER_ID}. Just keep in mind if you want to restart that exact same container you need to remember it’s id and run docker start {CONTAINER_ID}. While a container exists on your system what ever changes you make to the container will remain. If you remove the container by running docker rm {CONTAINER_ID} your changes are gone for life. Starting a container and making changes manually like we have done here is usually only done for development.
There is a way to build containers in a consistent manner which is a process I will get into in the next Docker post. That phrase is really starting to be “Your princess is in another castle” How many times am I going to talk about the next post….
If you are just testing docker, the methods described in this article are a great starting point. If you want to test out a new linux distribution, this is a fantastic way of doing it. You can quickly get into a centos box and learn it’s package management, or see which package versions are available for an older version of your os.
Quick recap of commands to know:
docker pulldocker rundocker run -td
docker psdocker ps -a
docker exec -itdocker rmidocker rm